Stateless Kubernetes overlay networks with IPv6
The Kubernetes network model is typically implemented by an overlay network, which allows pods to have an IP address decoupled from the underlying fabric. There's dozens of different overlay network implementations that combine a stateful IPv4 address allocator with VXLAN as a transport layer. IPv4 overlay networks have a number of well-documented drawbacks, which contributes to Kubernetes' reputation as difficult to operate beyond small cluster sizes (~10,000 machines).
This page describes an overlay network based on stateless IPv6 tunnels, which have better reliability and scalability characteristics than stateful IPv4 overlays. It uses IETF protocols that are natively supported by the Linux kernel, and since it is independent of Kubernetes itself can support communcication between processes both inside and outside of containers.
Wire protocol
| IPv4 header | ||||
|---|---|---|---|---|
| 0 | (other IPv4 control fields) | |||
| 4 | ||||
| 8 | TTL | IP protocol (UDP) | IP checksum | |
| 12 | IPv4 source address | |||
| 16 | IPv4 destination address | |||
| UDP header | ||||
| 20 | source port | destination port (3544) | ||
| 24 | UDP length | UDP checksum | ||
| IPv6 header | ||||
| 28 | IPv6 control fields | |||
| 32 | ||||
| 36 | IPv6 source address | |||
| 40 | ||||
| 44 | ||||
| 48 | ||||
| 52 | IPv6 destination address | |||
| 56 | ||||
| 60 | ||||
| 64 | ||||
| IPv6 payload | ||||
6to4 (RFC 3056) is a standard for routing IPv6 traffic over an IPv4 network. It was originally designed as part of the IPv6 migration strategy, allowing isolated IPv6-only networks to use existing internet infrastructure. The protocol is extremely simple – the IPv6 packet is treated as an IPv4 payload, using protocol number 41.
Teredo (RFC 4380) extends 6to4 by adding a layer of UDP encapsulation, which can improve compatibility with intermediate network devices that have compatibility issues with non-TCP/UDP protocols. This page assumes use of Teredo, but if the underlying network allows 6to4 (protocol 41) then the UDP encap can be turned off to save 8 bytes per packet.
The Linux kernel has built-in support for creating 6to4 tunnels in the sit driver. Such tunnels can optionally use the Teredo protocol by enabling the Foo Over UDP (FOU) mode, which is a setting for Linux tunnel drivers that encapsulates packets in UDP. FOU computes synthetic source ports for outbound packets based on the encapsulated packet's connection tuple, thus allowing intermediate routers to distinguish underlying streams (e.g. for link aggregation or flow control).
Pod address allocation
The 6to4 wire protocol describes how to encapsulate IPv6 packets, but doesn't mandate how IPv6 addresses should be assigned or how a router should calculate the IPv4 address of the destination
Allocating pod addresses with 6rd has a number of helpful properties:
- Given a pod's IPv6 address, its host's IPv4 address can be computed mechanically by the kernel. There is no userspace routing component.
- Each host IPv4 address maps to a 64-bit IPv6 network prefix. Pod IPs can be allocated from this prefix by the CNI host-local IPAM plugin without any risk of conflict.
- IPv6 addresses can be allocated from a Unique Local Address (RFC 4193) range, which is similar to IPv4 private address ranges (e.g. 10.0.0.0/8).
- A host's IPv4 address can have its high bits masked off, which is useful when every IPv4 address is being allocated from the same CIDR block (e.g. a private network).
Unfortunately the 6rd functionality of iproute2 is not well documented, and the error messages are opaque netlink error codes. When in doubt, I recommend examining the iproute2 and Linux kernel source code to understand how ip tunnel 6rd commands map to netlink parameters.
Setting up a 6to4 overlay
Generate a network prefix
To use a ULA range as a 6rd prefix, each IPv4 address must be masked to 16 bits or less. For this page I'll be using IPv4 addresses in the 10.0.0.0/8 range, which masks to 24 bits, so the ULA prefix needs to have its length fudged a bit (40 bits => 32).
python3 -c 'import os; print("".join("%02x" % b for b in os.urandom(4)))'
# 8ce4b05e
Converting this to ULA yields an IPv6 network prefix of fd8c:e4b0:5e00::/40.
Create the SIT interface
I'm not going to be stepping through each of these commands, so for folks not familar with Linux networking I recommend opening the ip-link(8) and ip-tunnel(8) manpages to follow along. The only thing to note is that the SIT interface is being created without a remote address – this is an overlay, not a tunnel.
There's two machines here, node-a and node-b, which will be set up with identical configuration (adjusted for their different IPv4 addresses):
- IPv4 address 10.1.1.100 maps to IPv6 prefix fd8c:e4b0:5e01:0164::/40.
- IPv4 address 10.1.1.101 maps to IPv6 prefix fd8c:e4b0:5e01:0165::/40.
ip addr show ens37
# 3: ens37: <BROADCAST,MULTICAST,UP,LOWER_UP> mtu 1500 qdisc pfifo_fast state UP group default qlen 1000
#     link/ether 00:50:56:36:1e:3d brd ff:ff:ff:ff:ff:ff
#     inet 10.1.1.100/24 brd 10.1.1.255 scope global ens37
#        valid_lft forever preferred_lft forever
#     inet6 fe80::250:56ff:fe36:1e3d/64 scope link
#        valid_lft forever preferred_lft forever
ip tunnel add kubetunnel0 \
#     mode sit \
#     local '10.1.1.100' \
#     ttl 64
ip tunnel 6rd dev kubetunnel0 \
#     6rd-prefix 'fd8c:e4b0:5e00::/40' \
#     6rd-relay_prefix '10.0.0.0/8'
ip -6 addr add 'fd8c:e4b0:5e01:0164::1/40' dev kubetunnel0
ip link set kubetunnel0 up
ip -6 addr delete '::10.1.1.100/96' dev kubetunnel0
ip addr show dev kubetunnel0
# 6: kubetunnel0@NONE: <NOARP,UP,LOWER_UP> mtu 1480 qdisc noqueue state UNKNOWN group default qlen 1000
#     link/sit 10.1.1.100 brd 0.0.0.0
#     inet6 fd8c:e4b0:5e01:164::1/40 scope global
#        valid_lft forever preferred_lft forever
ip addr show ens37
# 3: ens37: <BROADCAST,MULTICAST,UP,LOWER_UP> mtu 1500 qdisc pfifo_fast state UP group default qlen 1000
#     link/ether 00:50:56:3f:94:51 brd ff:ff:ff:ff:ff:ff
#     inet 10.1.1.101/24 brd 10.1.1.255 scope global ens37
#        valid_lft forever preferred_lft forever
#     inet6 fe80::250:56ff:fe3f:9451/64 scope link
#        valid_lft forever preferred_lft forever
ip tunnel add kubetunnel0 \
#     mode sit \
#     local '10.1.1.101' \
#     ttl 64
ip tunnel 6rd dev kubetunnel0 \
#     6rd-prefix 'fd8c:e4b0:5e00::/40' \
#     6rd-relay_prefix '10.0.0.0/8'
ip -6 addr add 'fd8c:e4b0:5e01:0165::1/40' dev kubetunnel0
ip link set kubetunnel0 up
ip -6 addr delete '::10.1.1.101/96' dev kubetunnel0
ip addr show dev kubetunnel0
# 5: kubetunnel0@NONE: <NOARP,UP,LOWER_UP> mtu 1480 qdisc noqueue state UNKNOWN group default qlen 1000
#     link/sit 10.1.1.101 brd 0.0.0.0
#     inet6 fd8c:e4b0:5e01:165::1/40 scope global
#        valid_lft forever preferred_lft forever
Test 6to4 functionality
Before going further, let's take the kubetunnel0 devices for a spin and make sure they're able to route packets. Any protocol encapsulated by IPv6 should work (here I test ICMPv6, TCP, and UDP).
ping6 -c 1 fd8c:e4b0:5e01:165::1
# PING fd8c:e4b0:5e01:165::1(fd8c:e4b0:5e01:165::1) 56 data bytes
# 64 bytes from fd8c:e4b0:5e01:165::1: icmp_seq=1 ttl=64 time=0.456 ms
#
# --- fd8c:e4b0:5e01:165::1 ping statistics ---
# 1 packets transmitted, 1 received, 0% packet loss, time 0ms
# rtt min/avg/max/mdev = 0.456/0.456/0.456/0.000 ms
nc -6lvn -p 1234
# Listening on [::] (family 10, port 1234)
echo 'Hello, world!' | nc -N fd8c:e4b0:5e01:165::1 1234
nc -6lvn -p 1234
# Listening on [::] (family 10, port 1234)
# Connection from fd8c:e4b0:5e01:164::1 39182 received!
# Hello, world!
If anything goes wrong – for example UDP works but TCP doesn't – you can use pretty much any packet capture tool to debug the overlay. Since 6to4 is a widely-deployed protocol, tools such as tcpdump know how to de-encapsulate the underlying flows.
tcpdump -i ens37 -nn --no-promiscuous-mode
# listening on ens37, link-type EN10MB (Ethernet), capture size 262144 bytes
# 05:04:16.648264 IP 10.1.1.100 > 10.1.1.101: IP6 fd8c:e4b0:5e01:164::1.39182 > fd8c:e4b0:5e01:165::1.1234: Flags [S], seq 1134988924, win 65320, options [mss 1420,sackOK,TS val 3326468574 ecr 0,nop,wscale 7], length 0
# 05:04:16.648496 IP 10.1.1.101 > 10.1.1.100: IP6 fd8c:e4b0:5e01:165::1.1234 > fd8c:e4b0:5e01:164::1.39182: Flags [S.], seq 2975133435, ack 1134988925, win 64768, options [mss 1420,sackOK,TS val 3023145745 ecr 3326468574,nop,wscale 7], length 0
# 05:04:16.648794 IP 10.1.1.100 > 10.1.1.101: IP6 fd8c:e4b0:5e01:164::1.39182 > fd8c:e4b0:5e01:165::1.1234: Flags [.], ack 1, win 511, options [nop,nop,TS val 3326468575 ecr 3023145745], length 0
# 05:04:16.648889 IP 10.1.1.100 > 10.1.1.101: IP6 fd8c:e4b0:5e01:164::1.39182 > fd8c:e4b0:5e01:165::1.1234: Flags [P.], seq 1:15, ack 1, win 511, options [nop,nop,TS val 3326468575 ecr 3023145745], length 14
# 05:04:16.648906 IP 10.1.1.101 > 10.1.1.100: IP6 fd8c:e4b0:5e01:165::1.1234 > fd8c:e4b0:5e01:164::1.39182: Flags [.], ack 15, win 506, options [nop,nop,TS val 3023145746 ecr 3326468575], length 0
# 05:04:16.648982 IP 10.1.1.100 > 10.1.1.101: IP6 fd8c:e4b0:5e01:164::1.39182 > fd8c:e4b0:5e01:165::1.1234: Flags [F.], seq 15, ack 1, win 511, options [nop,nop,TS val 3326468575 ecr 3023145745], length 0
# 05:04:16.649088 IP 10.1.1.101 > 10.1.1.100: IP6 fd8c:e4b0:5e01:165::1.1234 > fd8c:e4b0:5e01:164::1.39182: Flags [F.], seq 1, ack 16, win 506, options [nop,nop,TS val 3023145746 ecr 3326468575], length 0
# 05:04:16.649677 IP 10.1.1.100 > 10.1.1.101: IP6 fd8c:e4b0:5e01:164::1.39182 > fd8c:e4b0:5e01:165::1.1234: Flags [.], ack 2, win 511, options [nop,nop,TS val 3326468576 ecr 3023145746], length 0
#
# 8 packets captured
# 8 packets received by filter
# 0 packets dropped by kernel
Enable Teredo mode (UDP encapsulation)
Since Teredo is 6to4 in UDP, we enable FOU mode to turn a 6to4 overlay into a Teredo overlay. FOU mode can be configured to use any destination port – I'm using 3544 because that's the official Teredo port, and it helps packet capture tools figure out what's going on.
modprobe fou
ip fou add port 3544 ipproto 41
ip link set \
#     name kubetunnel0 \
#     type sit \
#     encap fou \
#     encap-sport auto \
#     encap-dport 3544
Note that Teredo support is not as widespread as 6to4. In particular, tcpdump doesn't know how to de-encapsulate it.
root@node-b:~# tcpdump -i ens37 -nn --no-promiscuous-mode
# listening on ens37, link-type EN10MB (Ethernet), capture size 262144 bytes
# 05:35:26.040293 IP 10.1.1.100.54772 > 10.1.1.101.3544: UDP, length 80
# 05:35:26.040348 IP 10.1.1.101.54181 > 10.1.1.100.3544: UDP, length 80
# 05:35:26.040868 IP 10.1.1.100.54772 > 10.1.1.101.3544: UDP, length 72
# 05:35:26.041134 IP 10.1.1.100.54772 > 10.1.1.101.3544: UDP, length 86
# 05:35:26.041140 IP 10.1.1.100.54772 > 10.1.1.101.3544: UDP, length 72
# 05:35:26.041185 IP 10.1.1.101.54181 > 10.1.1.100.3544: UDP, length 72
# 05:35:26.041412 IP 10.1.1.101.54181 > 10.1.1.100.3544: UDP, length 72
# 05:35:26.042305 IP 10.1.1.100.54772 > 10.1.1.101.3544: UDP, length 72
#
# 8 packets captured
# 8 packets received by filter
# 0 packets dropped by kernel
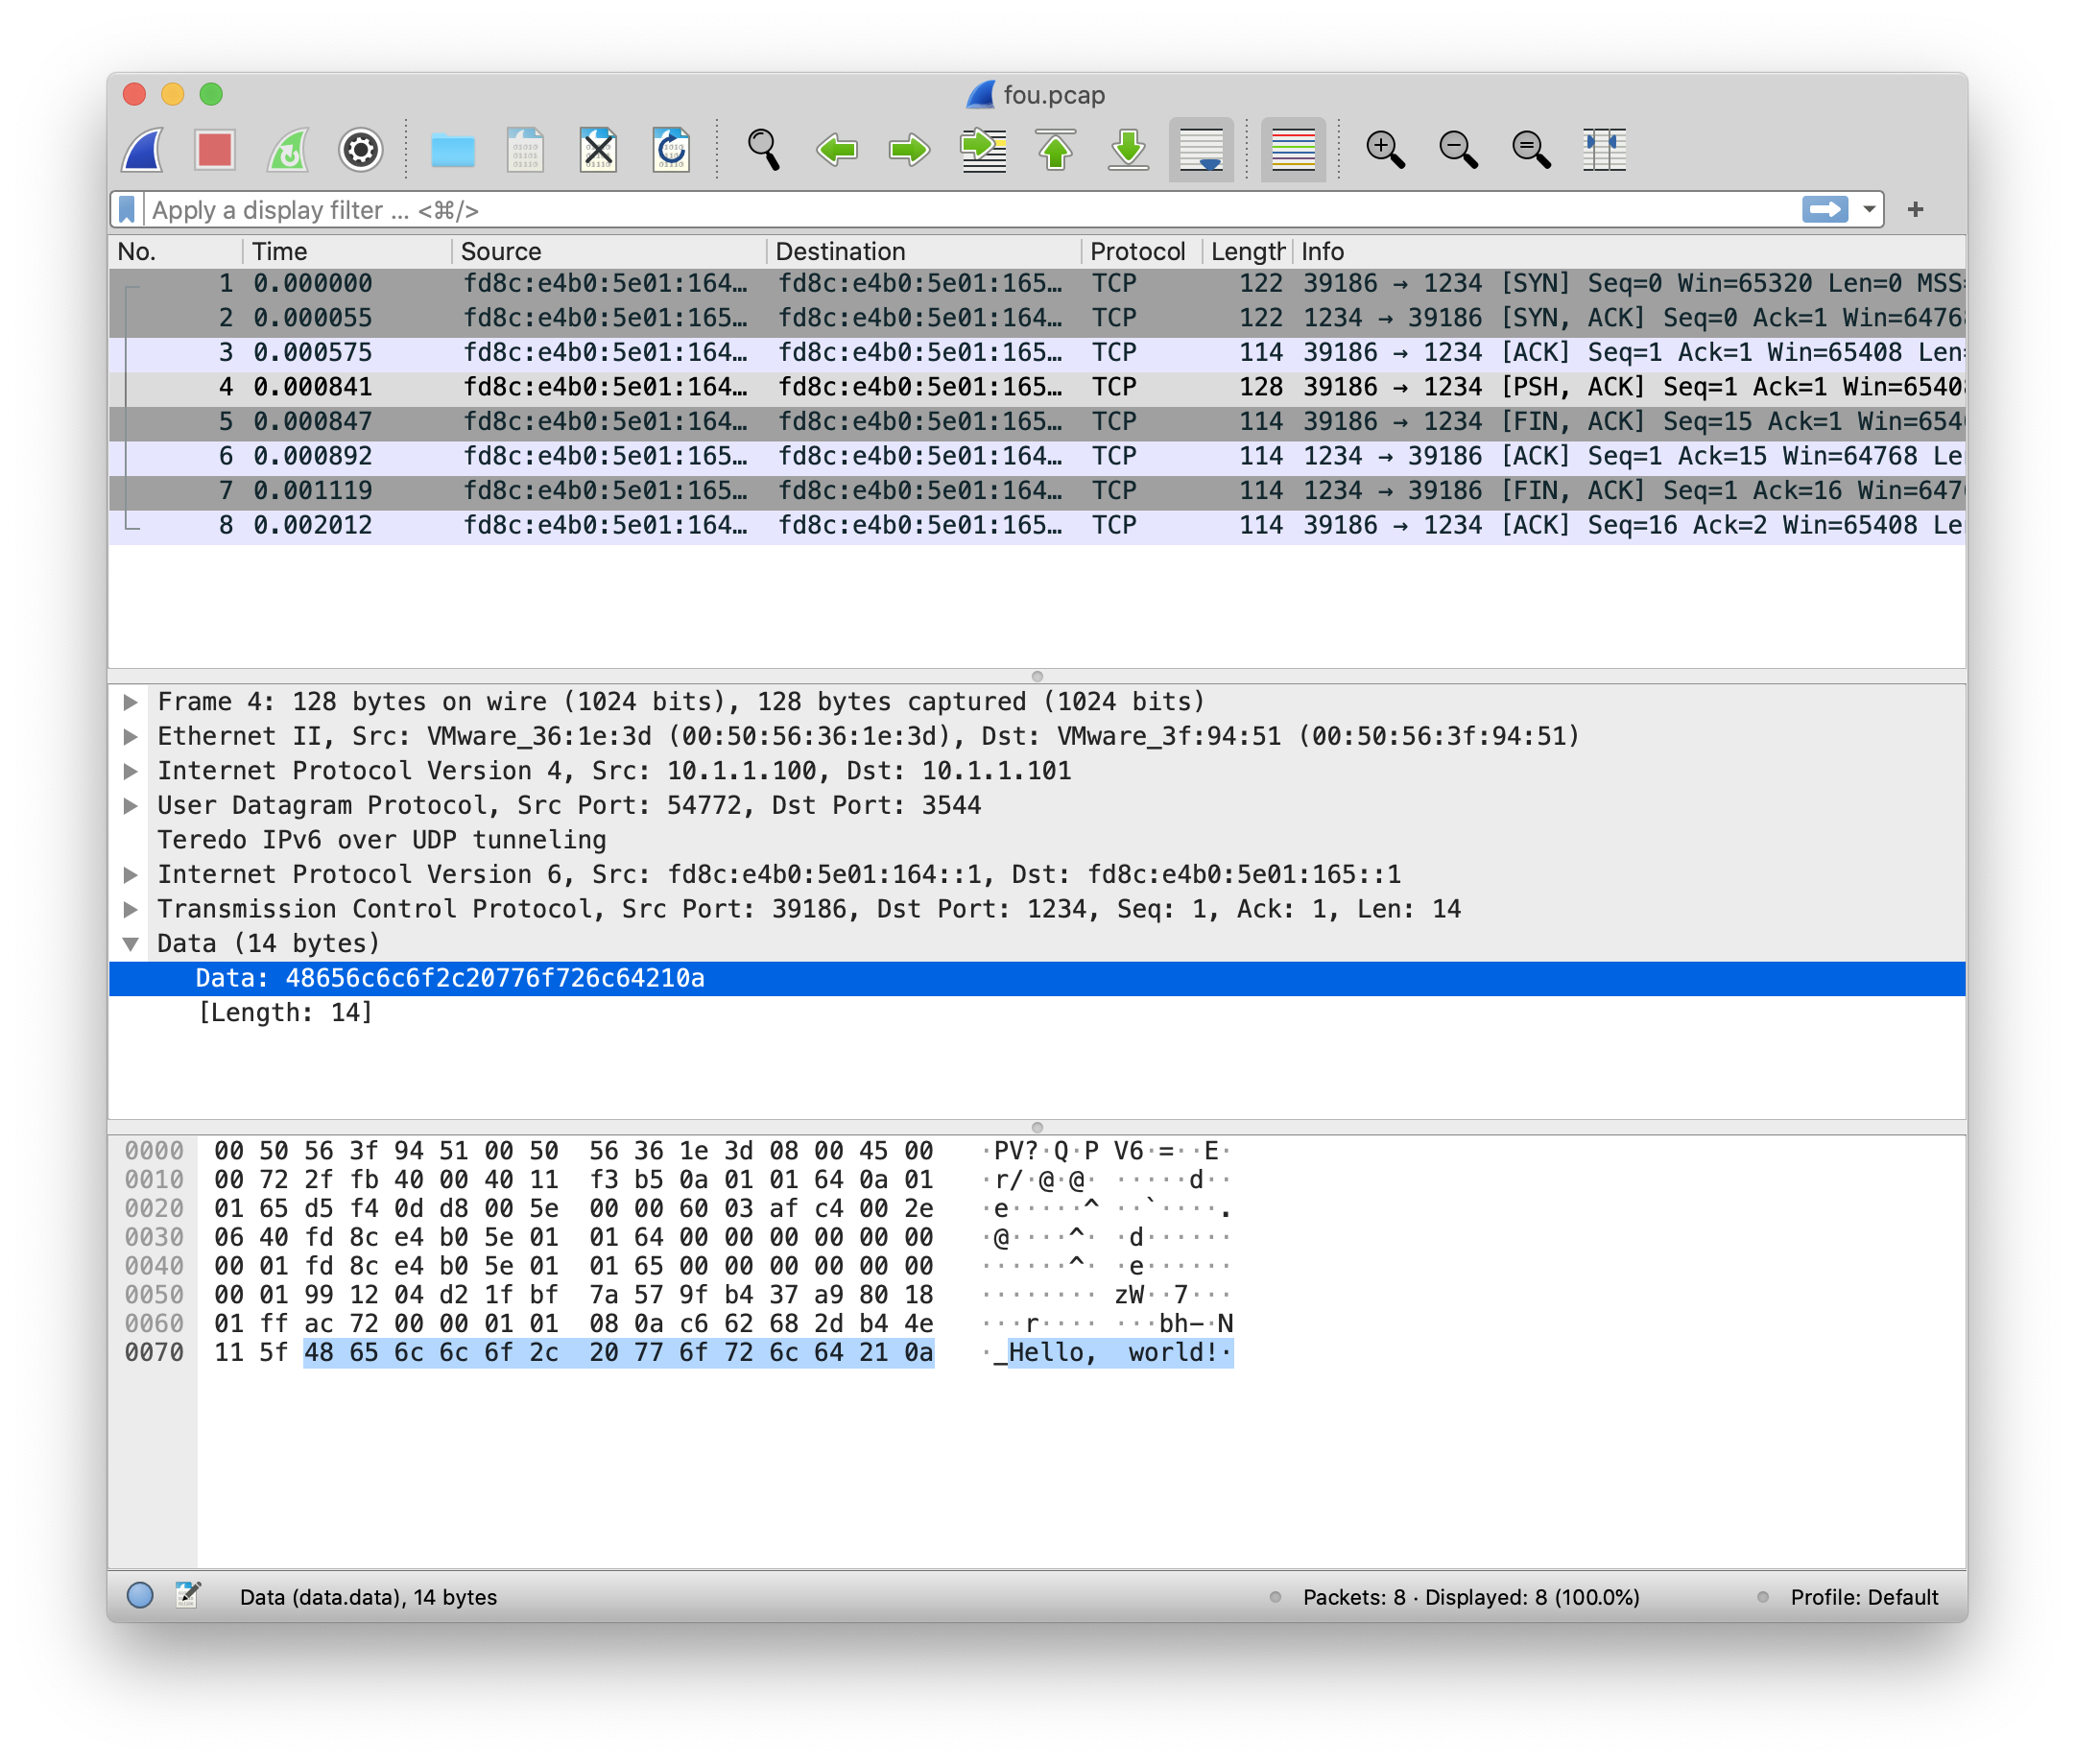
Wireshark works fine.
Persistent network configuration
Debian (ifupdown)
Create a file named /etc/network/interfaces.d/kubetunnel0 in interfaces(5) format. These commands are the same ones run earlier by hand.
If you don't want to use templating to inject the right local IPv4 address, or need something dynamic (e.g. if the host IPv4 is from DHCP), then move the commands into a helper binary and invoke it from this config file.
auto kubetunnel0
iface kubetunnel0 inet6 manual
  pre-up ip tunnel add "${IFACE}" \
    mode sit \
    local '10.1.1.100' \
    ttl 64
  pre-up ip tunnel 6rd dev "${IFACE}" \
    6rd-prefix 'fd8c:e4b0:5e00::/40' \
    6rd-relay_prefix '10.0.0.0/8'

  pre-up ip -6 addr add 'fd8c:e4b0:5e01:0164::1/40' dev "${IFACE}"
  up ip link set "${IFACE}" up
  post-up ip -6 addr delete '::10.1.1.100/96' dev "${IFACE}"

  down ip link set "${IFACE}" down
  post-down ip tunnel delete "${IFACE}"
You may also want to create a bridge device, so that pods can have NAT'd IPv4 IPs. This lets them talk to existing infrastructure that isn't part of the overlay network. I'll use 192.168.1.1/24 as the NAT range in this example. Put the following into /etc/network/interfaces.d/kubebridge0.
auto kubebridge0
iface kubebridge0 inet manual
  pre-up \
    iptables -t nat -C POSTROUTING -s 192.168.1.1/24 -j MASQUERADE || \
    iptables -t nat -A POSTROUTING -s 192.168.1.1/24 -j MASQUERADE

  pre-up ip link add name "${IFACE}" type bridge0
  pre-up ip addr add 192.168.1.1/24 brd + dev "${IFACE}"
  pre-up ip -6 addr add fd8c:e4b0:5e01:0164::1:1/112 dev "${IFACE}"

  up ip link set "${IFACE}" up

  down ip link set "${IFACE}" down
  post-down ip link delete "${IFACE}"
Kubelet configuration
After creating the interface, you still need to make the Kubelet use it for pod networking. Create a file /etc/cni/net.d/10-kubernetes-overlay.conf, using the host-local IPAM plugin to allocate addresses out of the host's IPv6 prefix:
- The "ranges" section sets which subnets to use for pod IPs. The following example allocates two IPs, one from the IPv6 overlay and one from the IPv4 bridge NAT.
- The "routes" section configures the pod's network namespace to use the bridge for outbound packets.
Here there are fewer options if you want to avoid templating the config file. You might need to write a custom CNI plugin that queries the network state and invokes the other CNI binaries.
{
  "cniVersion": "0.3.1",
  "name": "kubernetes-overlay",
  "type": "bridge",
  "bridge": "kubebridge0",
  "hairpinMode": true,
  "ipam": {
    "type": "host-local",
    "ranges": [
      [ { "subnet": "fd8c:e4b0:5e01:0164::1:0/112" } ],
      [ { "subnet": "192.168.1.0/24" } ]
    ],
    "routes": [
      { "dst": "0.0.0.0/0", "gw": "192.168.1.1" },
      { "dst": "fd8c:e4b0:5e00::/40", "gw": "fd8c:e4b0:5e01:0164::1:1" }
    ],
    "dataDir": "/var/run/cni/networks/kubernetes-overlay"
  }
}
Other notes
Jumbo packets
If you're using jumbo packets on your network, be aware that the kernel creates two SIT interfaces: kubetunnel0 and sit0.
ip addr show sit0
# 4: sit0@NONE: <NOARP> mtu 1480 qdisc noop state DOWN group default qlen 1000
#     link/sit 0.0.0.0 brd 0.0.0.0
This mostly doesn't matter, except that some sit0 settings (including MTU) seem to affect all SIT tunnels on the machine. You'll want to adjust the sit0 and kubetunnel0 MTUs at the same time during interface creation. The MTU of sit0 should match the physical interface.
ip link set dev kubetunnel0 mtu 8950
ip link set dev sit0 mtu 9001
RFC 3068 reserved the 2002::/16 anycast prefix for 6to4 tunnels, so that each IPv4 address would convert to a 48-bit "routing prefix". This original scheme wasn't widely adopted because the user experience depends on both sides of the connection having access to high-quality tunnel routers. RFC 7526 officially deprecated the 2002::/16 prefix.